User Guide
When powered on, the SquishBox starts a launcher that allows you to run applications, browse tools, or modify system settings.
Navigation is designed to be simple and usable without a keyboard or display larger than the built-in LCD.
Basic Controls
The primary control is the pushbutton rotary encoder.
Turn the encoder to move through menus or adjust values
Tap the encoder to confirm a selection
Press and hold the encoder to cancel, go back, or exit the current screen
Most built-in applications follow this same control scheme.
Text Entry
The SquishBox includes an on-screen text entry mode for naming files, editing settings, and entering text without a keyboard.
Pressing the encoder toggles between two cursor modes:
Blinking block cursor — Move the cursor position by turning the encoder
Underline cursor — Change the current character by turning the encoder
This allows text to be entered entirely from the front panel.
If a USB or wireless keyboard is connected to the Raspberry Pi, keyboard input is also accepted anywhere text entry is available.
Safe Shutdown
To safely power down the system before disconnecting power, choose Shutdown from the Exit menu.
This helps prevent filesystem corruption or SD card damage.
Software
File locations
By default, configuration and media files for the SquishBox are organized in the folder structure shown below. Directories are created by apps as needed.
~/Squishbox/
 ├── config/
 ├── banks/
 │   ├── fluidpatcher/
 │   └── amsynth/
 ├── media/
 │   ├── sounds/
 │   ├── midi/
 │   └── music/
 ├── playlists/
 └── sets/
The main configuration file is stored at config/squishboxconf.yaml,
and defines settings such as:
LCD configuration
UI timings
Inputs/Outputs and bindings
Custom LCD characters
The config directory is also the default location for app configuration files.
User Interface
The SquishBox launcher starts automatically on boot and serves as the main entry
point for applications and utilities. It provides a menu for launching programs
and scripts, and also acts as a fallback environment if an application exits or
crashes. Additional directories containing user scripts can be added using the
app_dirs configuration option.
Most applications, including the launcher, provide access to shared system menus for configuring MIDI, Wi-Fi, LCD settings, and power options.
MIDI Routing
The SquishBox manages connections between MIDI devices and applications
as defined in the midi_connections section of the configuration file.
midi_connections:
- DONNER DMK25Pro:0(DONNER DMK25Pro MIDI 1)>FluidPatcher:0(FluidPatcher)
- QuNexus:0(QuNexus Control Surface)>SquishBox minijacks:1(SquishBox minijacks Out)
These settings can be easily managed from the MIDI Settings menu by first selecting the MIDI input device, then selecting the destination.
Applications that use MIDI internally (such as fpatcherbox) typically
appear as available destinations only while they are running.
The port SquishBox MIDI out sends messages from any hardware controls
that are configured to do so (e.g. footswitches). The SquishBox MIDI in
port is used by the system to detect when new devices are connected.
Special any entries may be used to create automatic routing rules. For
example:
Connect any MIDI device to a specific application
Connect a specific MIDI device to any application
Automatically connect any device to any available application (
any>any- the default behavior)
Wi-Fi Settings
The Wi-Fi Settings menu allows scanning for wireless networks, connecting to access points, and enabling or disabling Wi-Fi entirely.
Most applications display a Wi-Fi status icon. This icon indicates whether the Wi-Fi hardware is enabled, not whether the system is currently connected to a network.
Disabling Wi-Fi may improve reliability in some situations, since Wi-Fi scanning and background network activity can increase memory usage and occasionally interfere with real-time audio applications.
Included Apps
The included applications serve two purposes:
Fully supported tools and audio programs for daily use
Reference examples for developers using the SquishBox Python API
Bug reports and feature requests can be submitted through the project GitHub issue tracker.
fpatcherbox
Flexible synth and sound module built around the FluidSynth engine using the FluidPatcher Python package.
The interface allows:
Selecting patches, adding/removing/saving patches, and loading/saving banks
Adjusting FluidSynth’s built-in reverb and chorus effects
Live selection of soundfont presets on any channel
Creation of MIDI keyboard routing layers on-the-fly
Pressing and holding the encoder at the main screen toggles between displaying MIDI activity and full MIDI message information.
The app recognizes several custom router rule parameters:
lcdwriteWrites a message on the LCD when a MIDI event matches the rule. If the rule also has a
formatparameter of the formw.n, the event value is written with the specified width and number of decimal places.setpinSets the named SquishBox output. Can be used to turn an LED on/off in response to a MIDI event.
patchApplies a patch by name or increments the current patch by an amount.
amsynthbox
Front-end wrapper for the amsynth analog-modeling synthesizer.
All synth parameters can be adjusted using the menu, or bound to
MIDI control change events using the MIDI Learn option.
The midi_channel option in the configuration file sets the MIDI channel
amsynth will respond to. A value of 0 responds to any channel.
trackbox
Playlist-based music player with live track reordering and quick cuts.
Most types of audio files can be played, and are stored in media/music/
by default. The root location for music is set using the tracks_path
item in the configuration file.
The list of music files to play can be edited from the Edit Tracklist option in the menu. Track lists are saved as YAML files.
tracks_path: chill
first: 0
tracks:
- file: Hotel Pools - Melt.mp3
- file: downloadedfile1823.mp3
  name: Mallsoft Vibes
  start: 8:31
  end: 12:15
- file: synthwave_mixdown.wav
  name: My Chill Beats
  level: 0.8
Tracklists can also have a tracks_path parameter that is relative
to the config file value or absolute. Tracklists start at the last
played track, or the index given by first if present.
sbedit
Lightweight text editor that supports both encoder input and keyboards. Useful for editing config files or making changes to banks. When scrolling through lines, the line number is flashed at the left edge of the screen. Tapping the encoder edits the current line. Pressing and holding the encoder opens a menu for loading/saving files or inserting/deleting rows.
sbcommander
File manager for copying, moving, renaming, deleting files, and running shell commands. Able to mount/unmount USB drives and copy directory trees, making it a useful tool for managing files on the SquishBox without a network connection.
Shell commands can be entered using encoder input or a keyboard. If file(s) are currently selected, they are added as arguments at the end of the command. The output of the command is displayed on the LCD and can be scrolled by turning the encoder.
glyphedit
Utility for creating and editing custom LCD glyph characters.
Hardware Connections
Audio Outputs
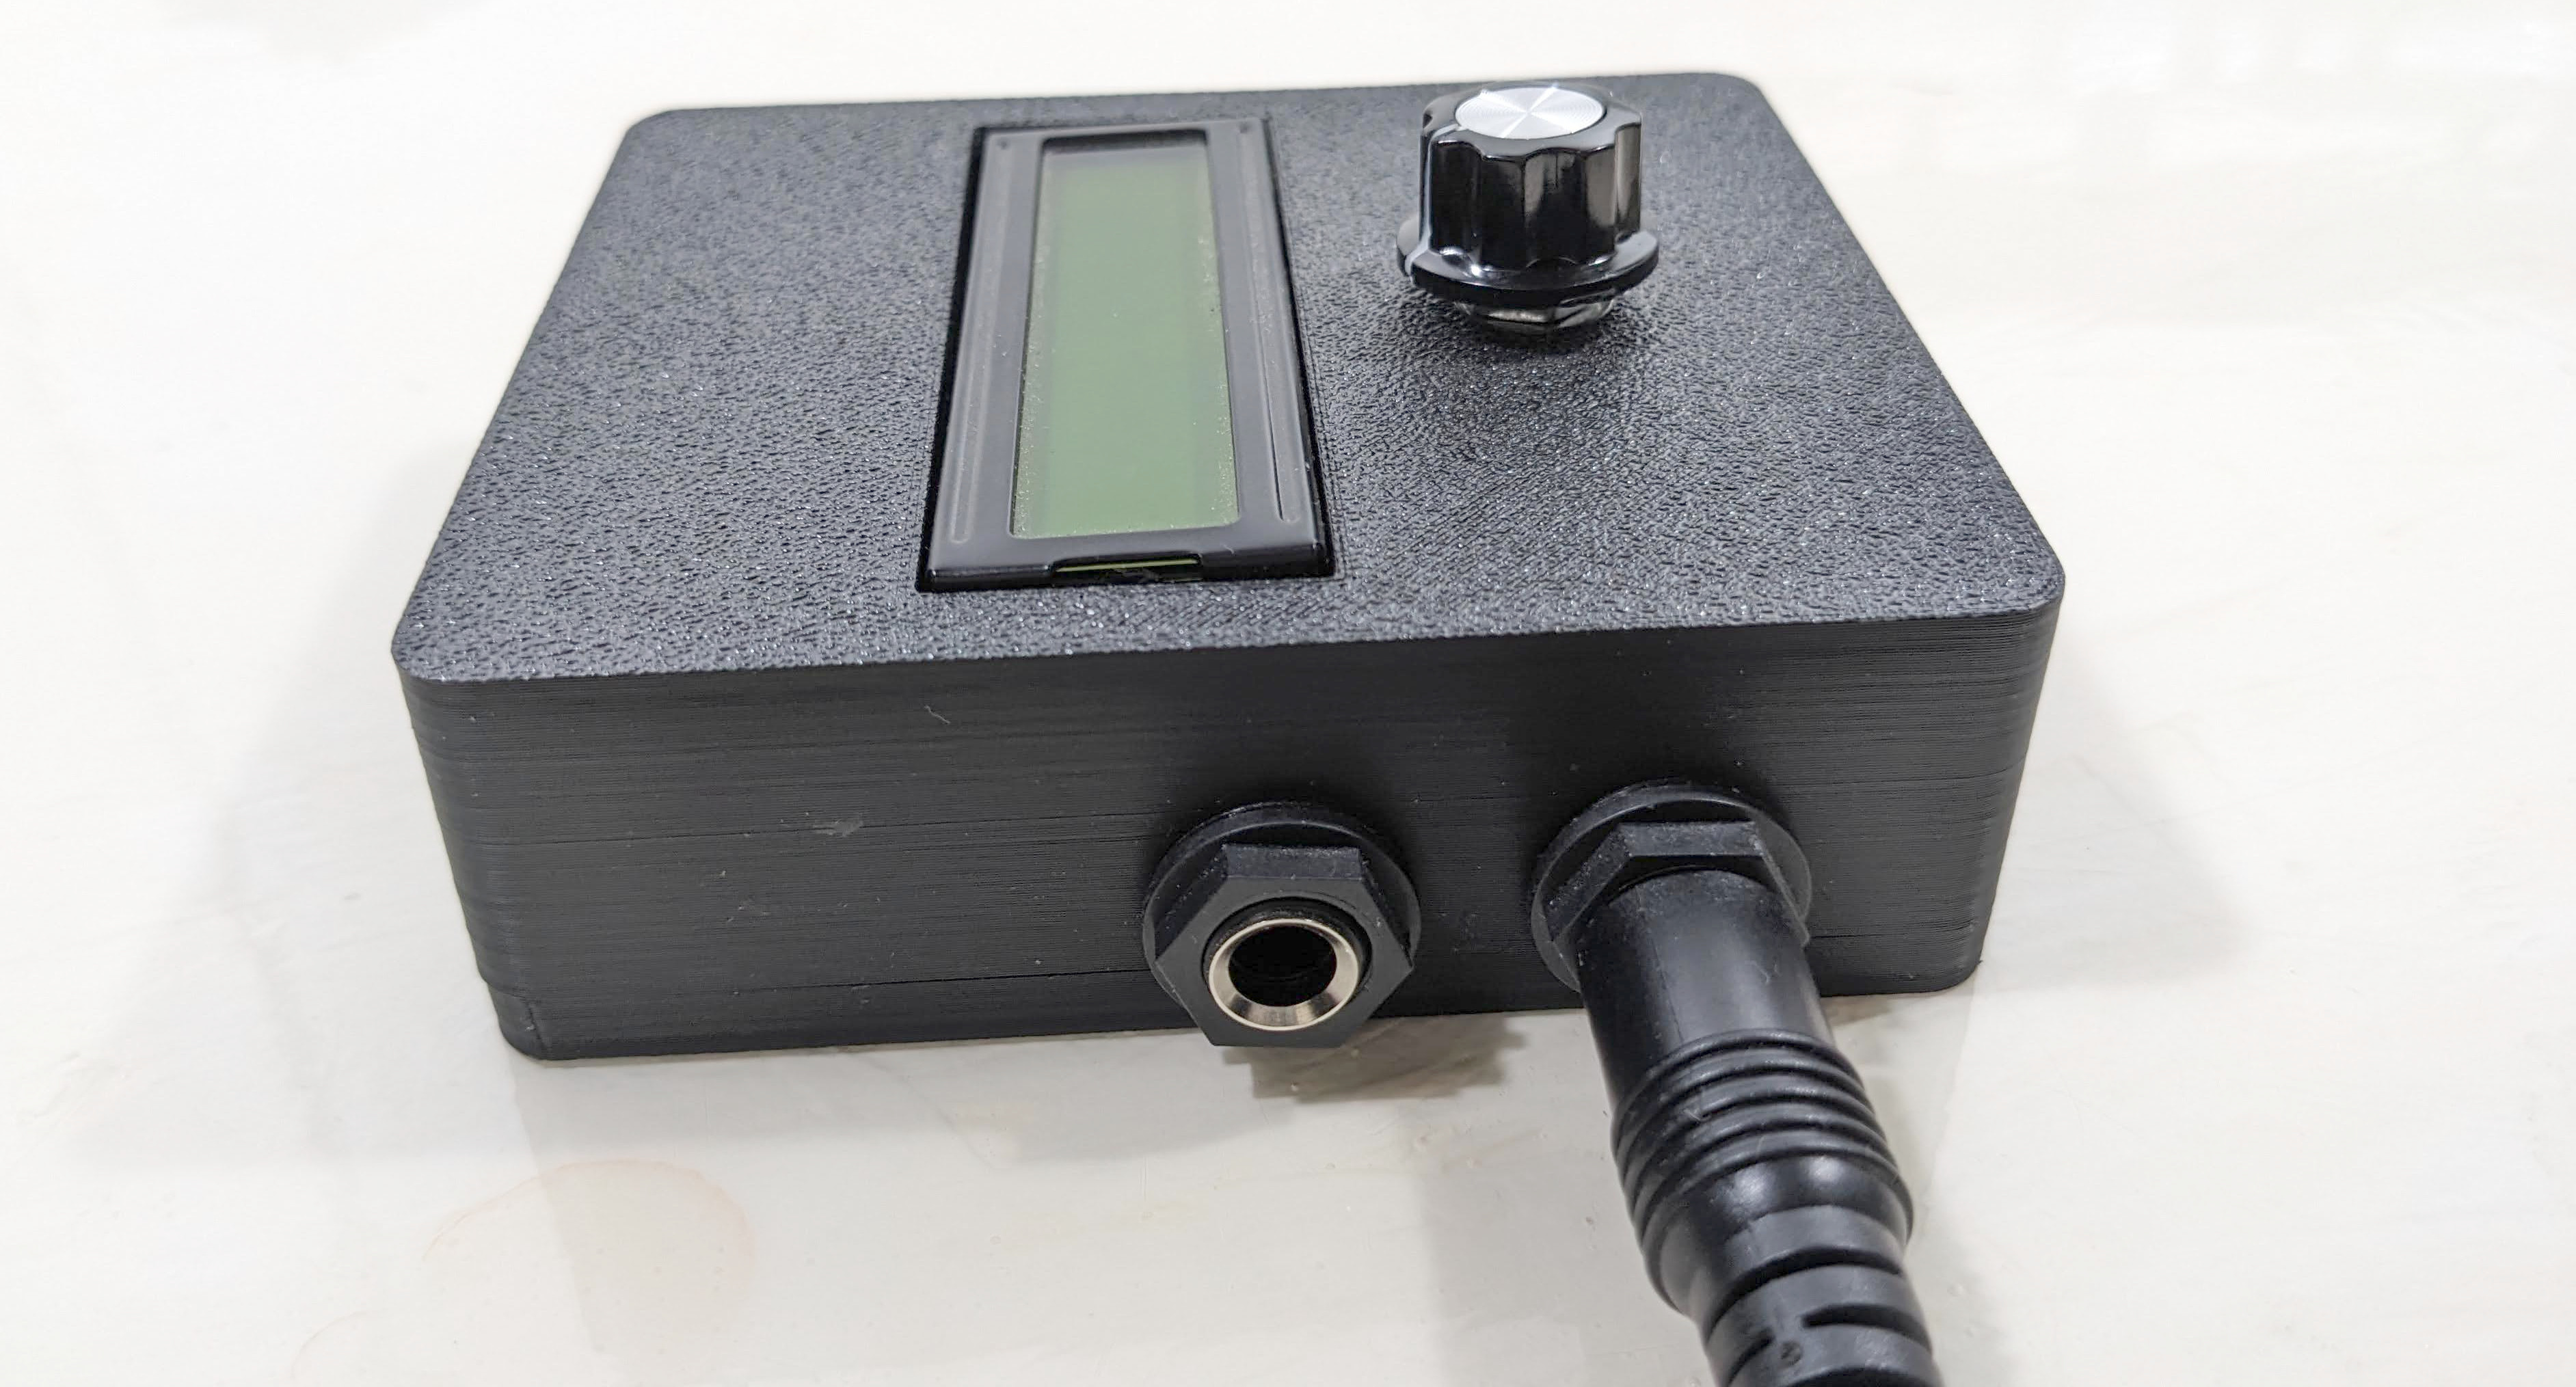
The SquishBox provides two 1/4” audio output jacks.
Physical orientation:
Rear jack = Left / Headphone output
Front jack = Right / Mono output
(When viewed face-on, these appear on the left and right sides respectively.)
Behavior:
If only the Right / Mono jack is connected, left and right channels are summed to mono on that output.
If only the Left / Headphone jack is connected, stereo audio is routed to the tip and sleeve of a TRS connector for headphone use.
The PCB silkscreen also labels both jacks.
Audio ports in mono connection mode
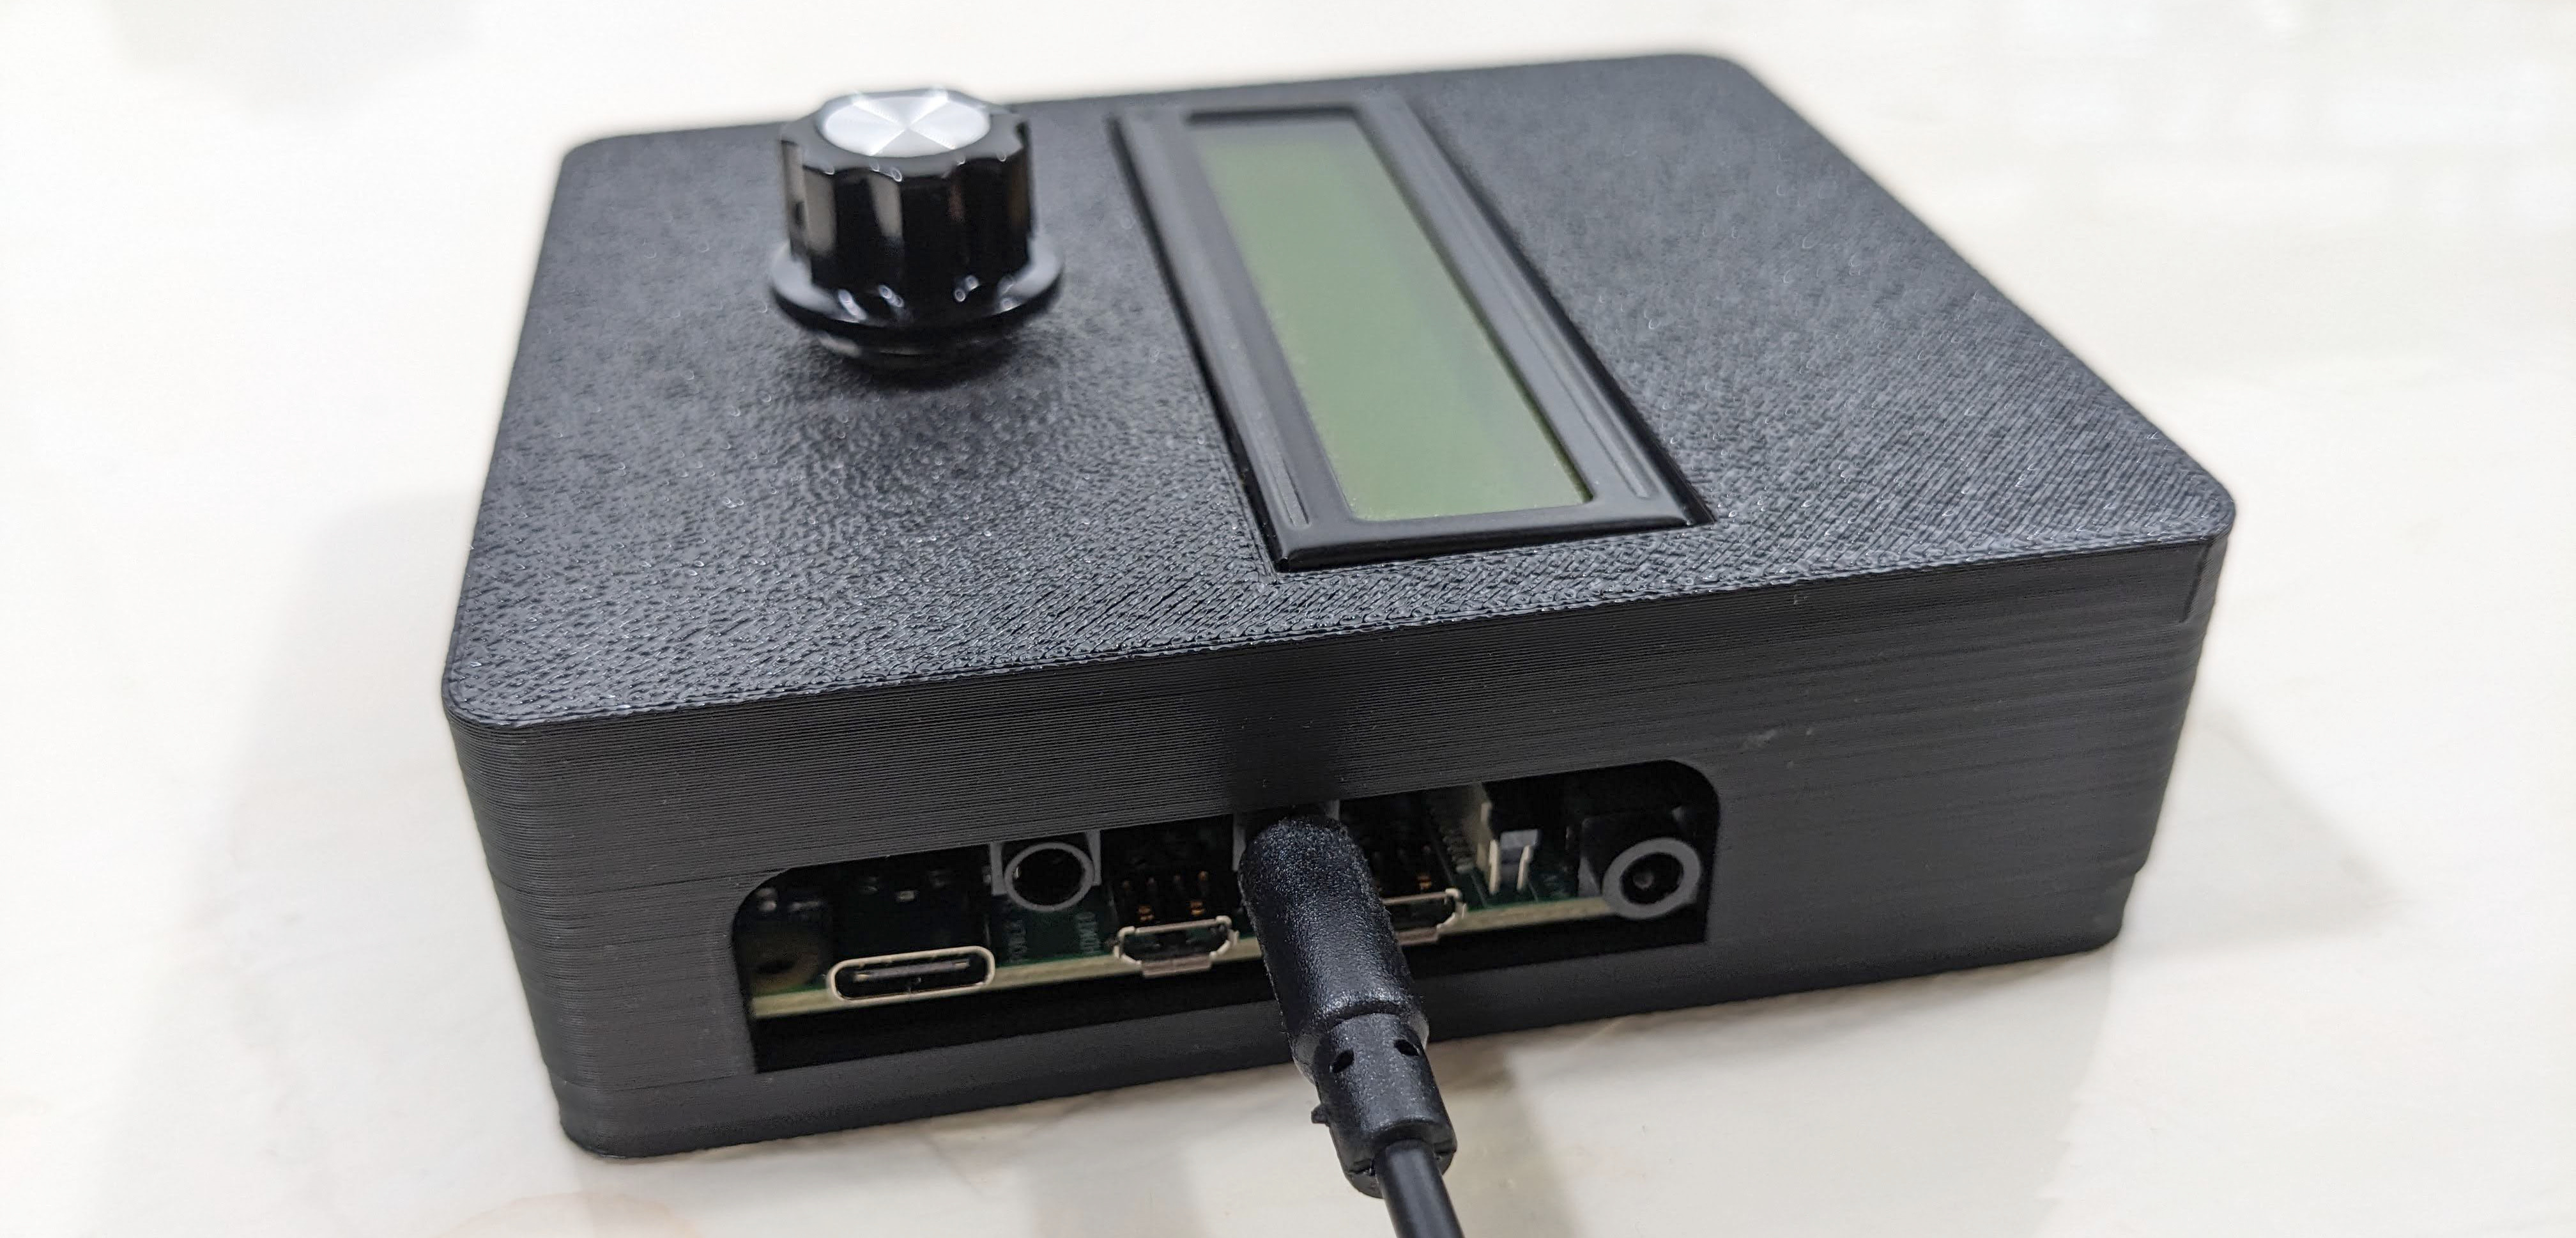
MIDI TRS Ports
The SquishBox includes MIDI input and output on 3.5 mm TRS minijacks.
Physical orientation:
Front jack = MIDI Out
Rear jack = MIDI In
(When viewed from the front, these appear on the left and right sides respectively.)
The PCB silkscreen also identifies each port.
Headers with jumper blocks allow the MIDI jacks to be configured for either TRS MIDI wiring standard:
Type A = horizontal jumper position ( = )
Type B = vertical jumper position ( ‖ )
Set both jumpers to match the equipment you are connecting.
Connection to MIDI IN minijack
Display Contrast Adjustment
The LCD contrast trimmer is accessible with the Raspberry Pi installed and the rear cover removed.
Use a small screwdriver to adjust the trimmer for the best display clarity.
Contrast is controlled by both:
The hardware trimmer potentiometer
Software contrast settings
For best results, install the software first, then adjust the trimmer so the software setting has a useful adjustment range.
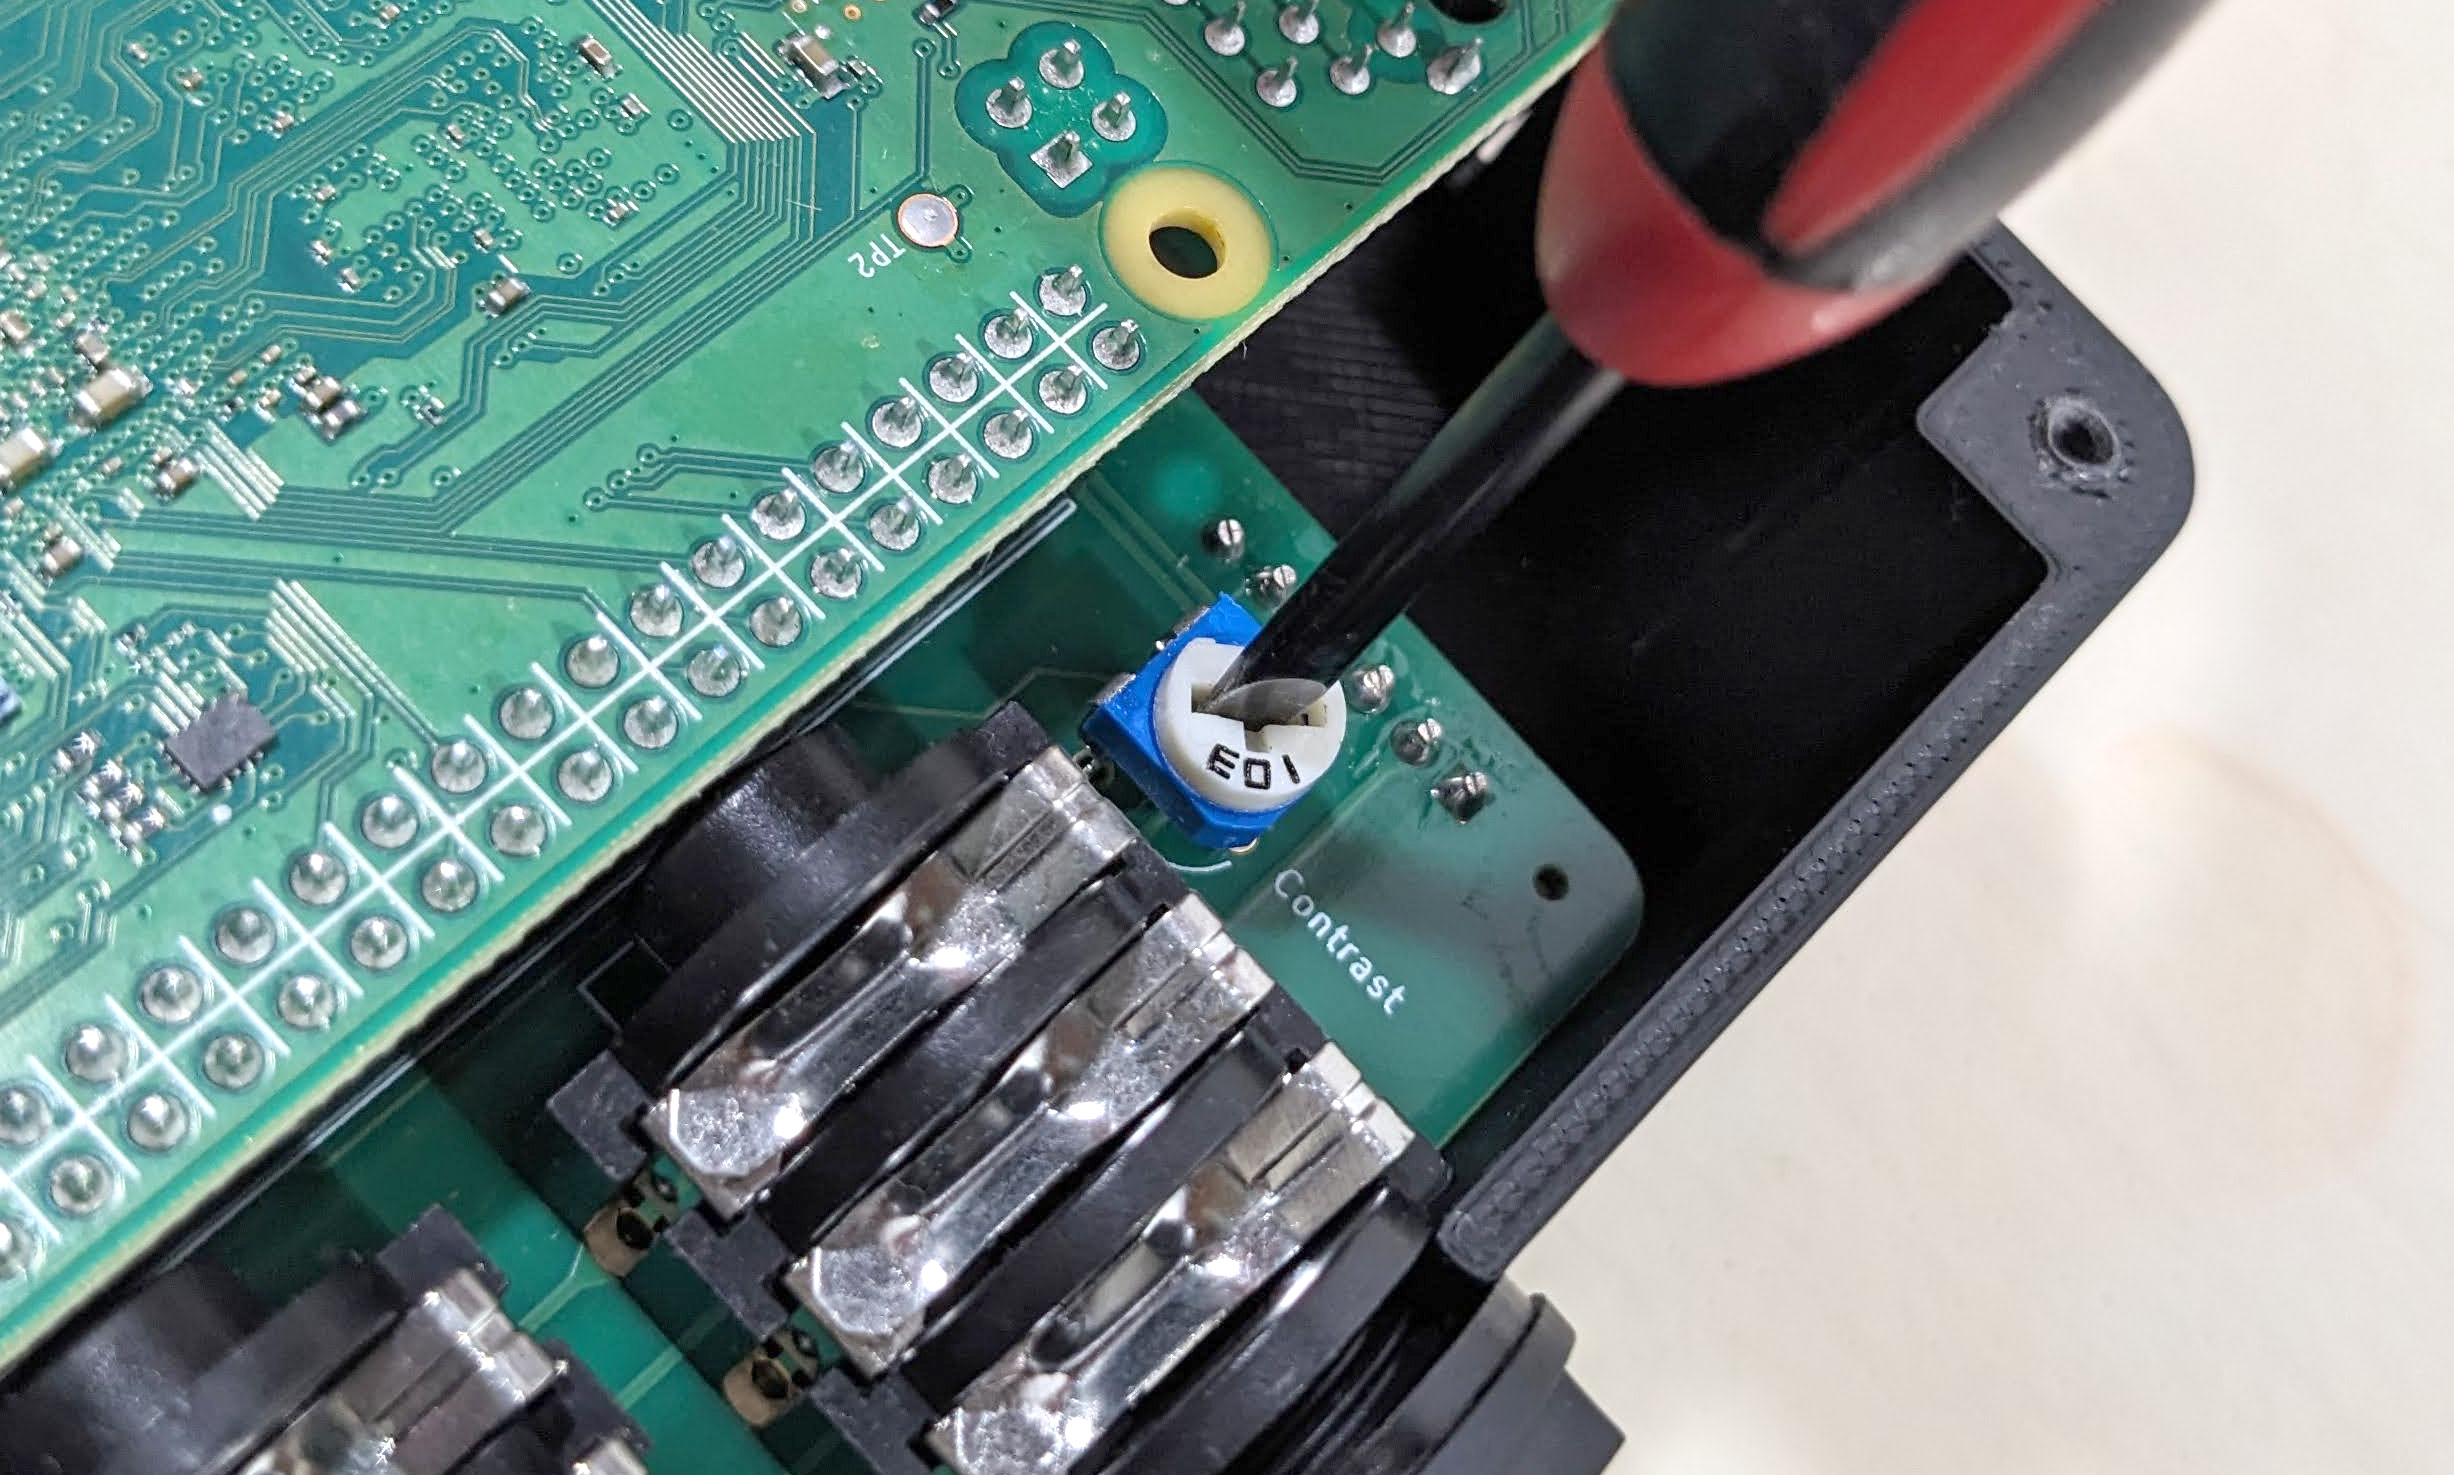
Adjustment of hardware contrast